

Contact Form 7の基本的な設定が完了したら、デザインを整えてサイトの雰囲気に合わせます。
この記事では、シンプルなフォームデザインのカスタマイズ方法をご紹介します。
目次
デザインカスタマイズ
入力フォームのデザインを統一感のあるものに整えるためのCSSサンプルです。
フォームHTMLサンプル
<p>
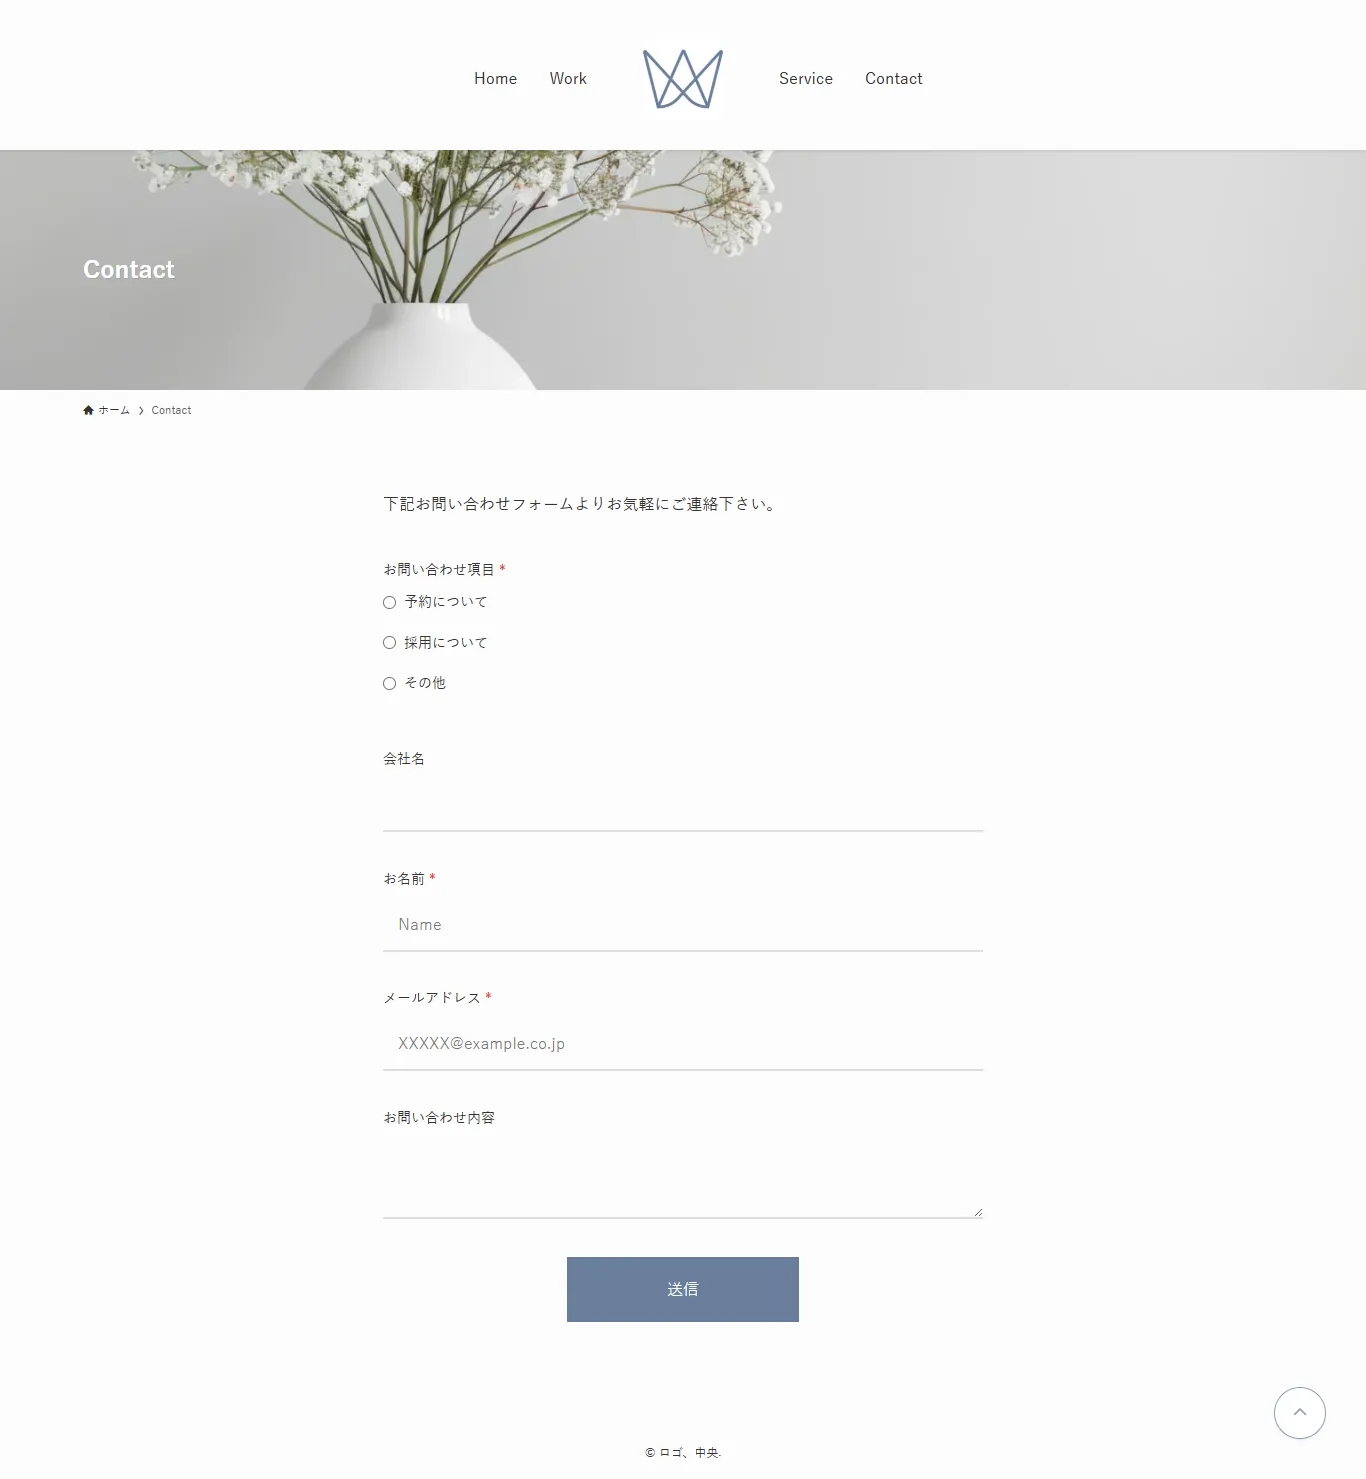
<label>お問い合わせ項目<span class="required-mark">*</span></label><br>
[radio radio-type use_label_element "予約について" "採用について" "その他"]
</p>
<p>
<label>会社名</label><br>
[text your-company]
</p>
<p>
<label>お名前<span class="required-mark">*</span></label><br>
[text* your-name placeholder "Name"]
</p>
<p>
<label>メールアドレス<span class="required-mark">*</span></label><br>
[text* your-email placeholder "XXXXX@example.co.jp"]
</p>
<p>
<label>お問い合わせ内容</label><br>
[textarea your-message]
</p>
<p>[submit "送信"]</p>デザイン調整CSSサンプル
/* すべての入力欄の基本スタイル */
.wpcf7 form input[type="text"],
.wpcf7 form input[type="email"],
.wpcf7 form textarea {
    width: 100% !important;
    padding: 12px 15px !important;
    border: none !important;
    border-bottom: 2px solid #ddd !important;
    background-color: transparent !important;
    color: #333 !important;
    font-size: 16px !important;
    transition: border-color 0.3s ease !important;
    box-sizing: border-box !important;
    border-radius: 0 !important;
}

/* フォーカス時の下線 */
.wpcf7 form input[type="text"]:focus,
.wpcf7 form input[type="email"]:focus,
.wpcf7 form textarea:focus {
    outline: none !important;
    border-bottom-color: #333 !important;
}

/* ラベルのスタイル */
.wpcf7 form label {
    font-size: 14px !important;
    font-weight: 500 !important;
    margin-bottom: 8px !important;
    display: block !important;
}

/* テキストエリアの高さ調整 */
.wpcf7 form textarea {
    min-height: 50px !important;
    max-height: 120px !important;
    height: 80px !important;
    resize: vertical !important;
    overflow-y: auto !important;
}

/* 各入力項目の余白 */
.wpcf7 form p {
    margin-bottom: 10px !important;
}

/* 必須マーク(*)を赤く */
.wpcf7 form label .required-mark,
.wpcf7 form .required-mark {
    color: red !important;
    margin-left: 4px !important;
}

/* ラジオボタンを縦並びに */
.wpcf7 form .wpcf7-list-item {
    display: block !important;
    margin-bottom: 10px !important;
    margin-left: 0 !important;
}

/* ラジオボタンのリスト全体 */
.wpcf7 form .wpcf7-radio {
    display: flex !important;
    flex-direction: column !important;
}

/* ラジオボタンの基本スタイル */
.wpcf7 form input[type="radio"] {
    accent-color: #333 !important;
    cursor: pointer !important;
    margin-right: 8px !important;
}

/* ラベルもクリックしやすく */
.wpcf7 form .wpcf7-list-item label {
    cursor: pointer !important;
    display: flex !important;
    align-items: center !important;
}
送信ボタンのカスタマイズ
送信ボタンを中央寄せにしてもなぜか左にずれてしまったのですが、読み込みスピナーを非表示にすることで解決しました。
送信ボタンのCSSサンプル:
/* 送信ボタンの親要素を中央寄せ */
.wpcf7-form>p:last-of-type {
    text-align: center !important;
    display: flex !important;
    justify-content: center !important;
    align-items: center !important;
}

/* 送信ボタン */
.wpcf7-form input[type="submit"] {
    background-color: #6A7F9B !important;
    color: #fff !important;
    border: none !important;
    margin-top: 20px !important;
    padding: 20px 100px !important;
    cursor: pointer !important;
    transition: background-color 0.3s ease !important;
}

/* ホバー時 */
.wpcf7-form input[type="submit"]:hover {
    opacity: 0.8 !important;
}

/* スピナーを非表示 */
.wpcf7-spinner {
    display: none !important;
}
まとめ
CSSでカスタマイズすることで、Contact Form 7のフォームをサイトのデザインに合わせて自由に調整できます。
色やサイズ、余白などをお好みに変更して、オリジナルのフォームデザインを作ってみてください。
関連記事
-
 【WordPress】Instagramアイコンの色を変更する方法(グラデーションにも対応)
 -
【WordPress】アンカーリンクでアコーディオンを自動展開&スクロールさせる方法
-
【WordPress】オリジナルテーマで「アイキャッチ画像」の設定が出ない時の対処法
-
WordPressで特定のアーカイブページだけ表示件数を変更する方法
-
【Contact Form 7】規約同意欄をスクロール可能なボックスで表示する方法
-
【Contact Form 7】送信完了メッセージを改行する方法
-
【Contact Form 7】送信者名が変更できない時の解決方法(WP Mail SMTP併用時)
-
WordPressで追加したページのURLを確認する方法